Pink Pinwheel Party

Coraline had a pink pinwheel party for her first birthday. Sometimes pink can be elegant and playful without being overwhelmingly girly, and that’s what I was going for. We rented a little community center nearby for her party since there are so many more kids with friends and family now! It was well worth it to reduce chaos, and that we we didn’t need to figure out what to do with Sasha, who is confined to our first floor at home now that she is older.

20140315-Coralines-First-Birthday-Party-3951

We had two kids tables, one of ours and borrowed one from a neighbor, which was a great idea. We had a lot of 2 and 3 year olds in attendance!

20140315-Coralines-First-Birthday-Party-3953

The kids had a little craft to make their own pinless pinwheel they could do as well, and while I think the parents enjoyed it, I think it would be even more perfect for 4-5 year olds. I prepared all the paper for the pinwheels so no hole punching was needed, and gave directions for finishing off the pinwheel. All you need are some pipe-cleaners, pencils, stickers and crayons, plus scissors & stapler for parents to secure the pinwheel.

Microsoft Word - Make-Pinwheel-Instructions.docx

20140315-Coralines-First-Birthday-Party-4018

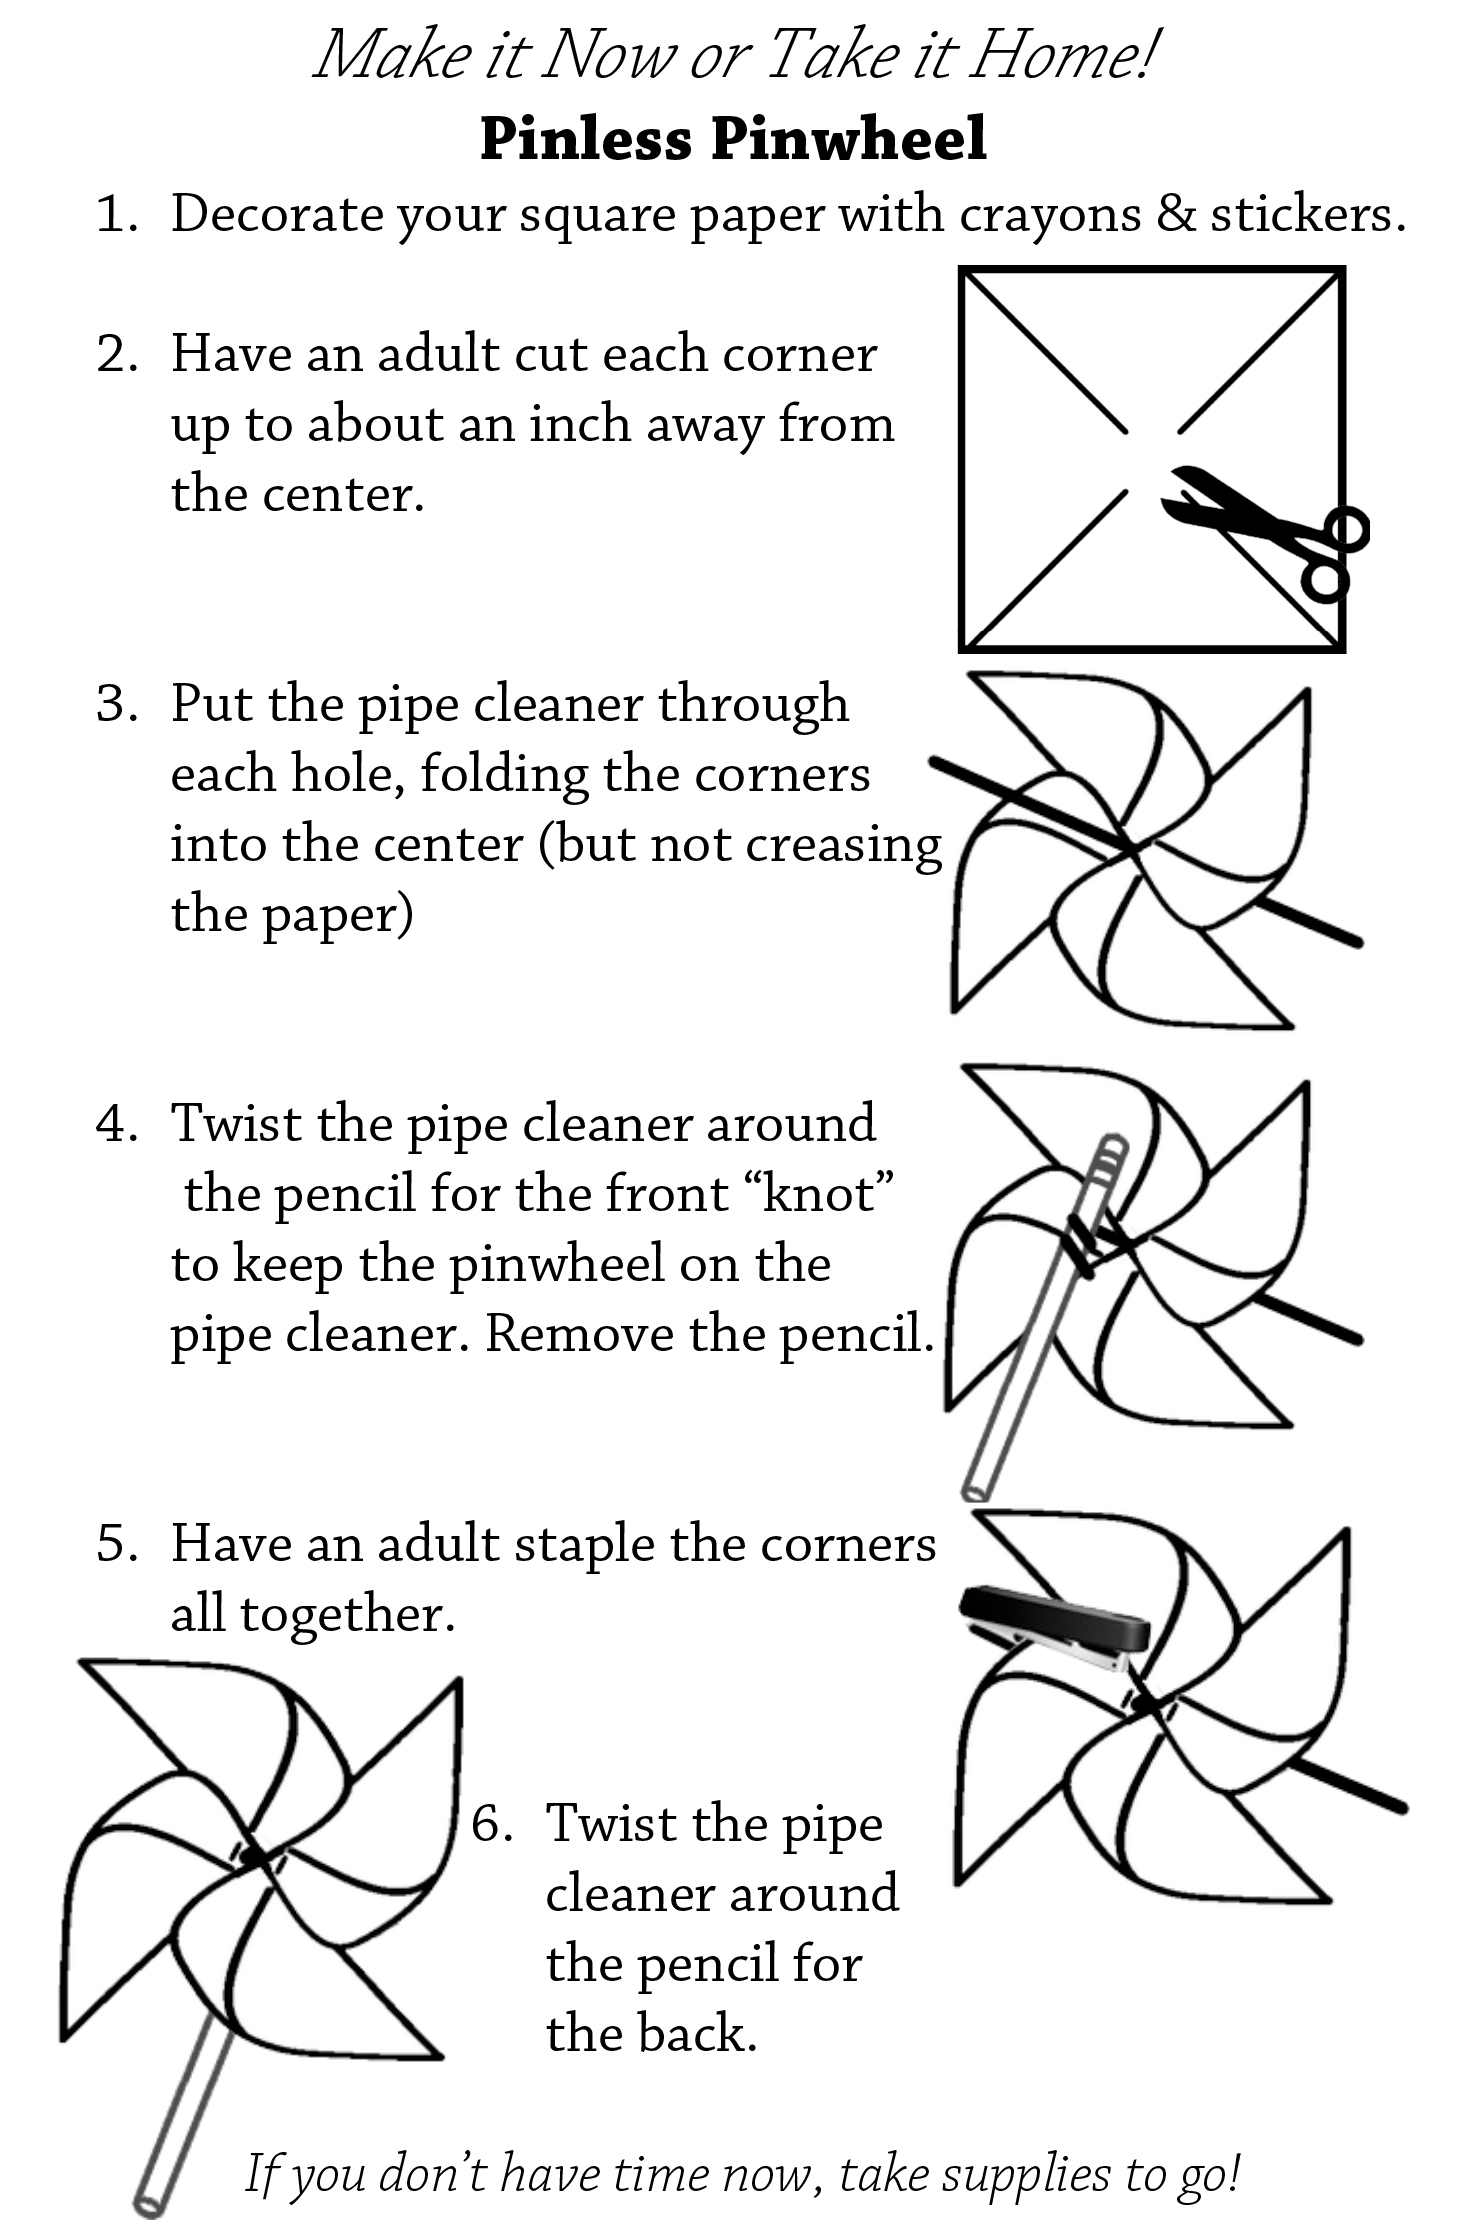
Each table had pinwheels for a playful centerpiece (a few of the arrangements were taken with them by guests, a sign of a great little centerpiece in my opinion!!). To make the pinwheels, I used a spray adhesive to make double-backed 12×12 scrapbook paper, then cut them down with a paper cutter in various sizes from 8×8 to 11×11 (most were around the 9×9 range).

20140315-Coralines-First-Birthday-Party-3957

I made the pinwheels without using pins, to keep it safe for all the kids attending the party so no one might be pricked. Instead I used pipe cleaners and buttons (I will allow that the buttons were small and a choking hazard themselves, but trusted they would keep secure to the sticks under parents’ watchful eyes, as they did).

The pinwheels are attached to candy sticks I purchased at Jo-Ann, or pre-painted dowel rods I purchased from Factory Direct Craft. The two types of clear glass bottles were a relatively cheap find at Factory Direct Craft (I cannot find them online anymore), and I put sand at the bottom.

20140315-Coralines-First-Birthday-Party-3950

I wanted to integrate photos into her party, just as I did with Jameson’s, since I take so many and love the conversation starters they provide to guests. Since the room had a chair rail along the walls, I avoided doing the giant “1” in photos that I did with Jameson’s because it would’ve looked awkward. Instead, we randomly put photos around the room with painters tape.

She also had her monthly photos banner above her high chair. I made small pinwheels, secured with brads and a glue gun to the clothespins, hung on twine. The pinwheels are top heavy, so it needed to be against a wall where they wouldn’t move around much.

20140315-Coralines-First-Birthday-Party-3959

20140315-Coralines-First-Birthday-Party-3973

For food, we kept it simple party fare: pulled pork, pasta salad, cheese & crackers tray, veggie tray, chips and an assortment of dips, fruit salad and of course, dessert. I made the same yellow cake recipe from her cake smash into cupcakes, and tried a chocolate cake from the same site as well.

20140315-Coralines-First-Birthday-Party-3964

20140315-Coralines-First-Birthday-Party-3968

I thought maybe Coraline would like a chocolate cake since she wasn’t fond of the vanilla, but no dice. She did taste it though, but putting her tongue right out onto the icing!

20140315-Coralines-First-Birthday-Party-3997

20140315-Coralines-First-Birthday-Party-4003

Daddy cut up the cupcake a bit and she tried the actual cake, but for the most part she was content (and sometimes concerned) just to look around at all the activity.

20140315-Coralines-First-Birthday-Party-4009

Coraline is big into trying to put things back, and she attempted to buckle herself up without success.

20140315-Coralines-First-Birthday-Party-4016

Meemaw and Aunt Holly came up for the occasion; unfortunately Uncle Tyler and Grandpa had to miss it.

20140315-Visit-from-Meemaw-and-Aunt-Holly-4078

20140315-Coralines-First-Birthday-Party-3992

We also had some baby friends join us, and Jameson’s friend Nathan came as well ready for St. Patrick’s Day!

20140315-Coralines-First-Birthday-Party-3985

20140315-Coralines-First-Birthday-Party-3986

20140315-Coralines-First-Birthday-Party-3996

When it was time to open gifts, Jameson wanted to jump right in and help. He certainly entertained, putting a bag over his head!

20140315-Coralines-First-Birthday-Party-4027

20140315-Coralines-First-Birthday-Party-4044

20140315-Coralines-First-Birthday-Party-4032

Coraline wanted to “try” her gifts before opening them. She got a lot of great toys and adorable clothes. She’s become partial to the Little People dolls, as well as putting together the Mega Blocks (Jameson was always into taking things apart when he was this age, so it’s fun to see Coraline putting things together instead).

20140315-Coralines-First-Birthday-Party-4036

20140315-Coralines-First-Birthday-Party-4050

20140315-Coralines-First-Birthday-Party-4059

20140315-Coralines-First-Birthday-Party-4047

We were so excited with all our friends and family who were able to come. We saw cousins and uncles who we hadn’t seen in a year and nearly all our friends invited were able to join us to celebrate Coraline’s birthday!

20140315-Coralines-First-Birthday-Party-4031

20140315-Coralines-First-Birthday-Party-3974

20140315-Coralines-First-Birthday-Party-4069

I love this one of Coraline, playing peekaboo with Grandma with her hands which is new!

20140315-Coralines-First-Birthday-Party-4023

I can’t believe that our little girl is one. From here out, our little baby will be growing up into an awesome little girl.

20140315-Birthday-Girl-Playing-4087

Continue Reading

Toddler-Friendly Pinwheels

20140120-Pink-and-Pinwheel-3190

We are getting ready for a big girl to turn the big O-N-E in just a month and half, and we’ve decided her party theme is going to be pinwheels! I thought it would be a great idea to have a little pinless pinwheel craft for all the toddlers who are going to be at her party this year. I’ve never done a craft for the parties we have hosted before, but the kids are getting to an age that I think it would be fun.

I combed through the internet for some suggestions, but the best one that doesn’t use pins, I think, is this one using pipe cleaners. You wouldn’t think that it would spin properly, but it does! Another option was using brads, but I don’t think those will spin quite as well.

20140119-Making-Kid-Friendly-Pinwheels-3064

First you need to prepare the paper for the kids. Kid scissors won’t work well here! haha. You will want a square paper, which you can get easily from a standard 8.5 x 11 sheet of paper by folding one edge together to make a triangle and cutting along the line. You can watch this video for direction as well!

Fold your square the other way so you have 4 triangles in your folds. Don’t forget, when you fold into the triangles, cut the center by trimming the tip off the triangle. That way you don’t need to try to get a hole punch there.

Cut down the triangle folds until you’re about an inch or a little less to the center. Then you’ll want to hold punch one corner on each triangle.

20140119-Making-Kid-Friendly-Pinwheels-3065

It’s time to decorate! Make sure you decorate both sides!

20140119-Making-Kid-Friendly-Pinwheels-3067

Then you’ll need half a pipe cleaner (chenille stick), a glue stick or a stapler (we are opting for the stapler), and something to attach it to. These are sticks for candy, but we’re going to use fun pencils for the party.

20140119-Making-Kid-Friendly-Pinwheels-3068

Wrap one of the chenille a couple times to make a stopper for the front of the pinwheel, and put the chenille through each hole for the pinwheel shape. Then you can staple it together. You do want to staple or attach the paper together some way so that it will spin. Otherwise, the paper will open itself up against the chenille and stick and get stuck. Stapling will let you leave the chenille a little loose so it can still spin.

20140119-Making-Kid-Friendly-Pinwheels-3069

20140119-Making-Kid-Friendly-Pinwheels-3074

Jameson at 3 had a bit of trouble blowing on it to make it go, but I showed him he could run around with it and make it spin as well and he thought that was fun, for all of a minute.

20140119-Making-Kid-Friendly-Pinwheels-3072

Continue Reading

Advent Stockings

On par with my usual crafting timelines, here I am over a year later finally completing the project that I started talking about last year. I purchased a set of stockings and mittens that look knit and are backed with felt from Factory Direct Craft last year. This year they are hanging from the garland on my stairway.

I originally wanted to use the Jesse tree story to be the basis for my ornaments, but found that those types of symbolic ornaments are hard to come by. Instead, I ran across these cute ornaments from Hobby Lobby on the cheap, and decided to make my own nativity scene animals to go with them.

Ornaments

The ornaments from Hobby Lobby looked like polymer clay. I’ve never used polymer clay (at least not since I was a kid) but I figured I could handle making a few animals. I bought Sculpey III clay from Amazon, and there it sat for another few months before I finally sat down, the night before they needed done, and started my clay animals.

Animals

My first animals were the camels, and you may be able to tell. I was least happy with how these turned out, but I doubt Jameson will care. This clay was little harder to work with than some of the other colors.

Camel Ornaments

I had a lot of trouble keeping my nails from scarring the clay, which you can see in these close ups. From farther away though, you can’t tell.

The next day, I made all the rest of the animals in the same amount of time it took me to make just two the day prior, about an hour and fifteen minutes. The rest of the animals were easier. I used pictures online of other polymer clay animals to get the basic idea of what I wanted for my own.

Horse Ornaments

Donkey Ornament

In order to make them ornaments, I needed to bake them with an eye-pin in them (perfectly safe to bake it with metal at the 275 degrees that Sculpey III clay requires). To make sure the eye-pins don’t come out, you bend the eye-pin in the shape of an L before pushing them into the clay.

Sheep Ornaments

The sheep were my favorite to make. I started with a base white ball and made lots of little balls to stick on around it, with more balls for head and feet in black. The eyes were hardest, because the shapes needed to be so small.

I carefully put them in the over on an older metal pan and made sure to use an in-oven thermometer to verify the temperature was 275 degrees. I had read that temperature is key for properly cured polymer clay and an oven thermometer is recommended. I had my oven between 285-290 to keep it at 275 for the duration of the baking, which was about 45 minutes for these guys.

I used cross stitch thread for hanging them, since that is easily and securely knotted. (I had first tried a thin beading string but it wasn’t secure enough) All told, there are about 10 snowflakes interspersed with nativity animals and the figurines.

Advent Stockings

Jameson enjoyed opening the first two (since I was a day late). I made sure an animal was in one of them, since that is quite a bit more exciting than a snowflake. He’s not good at hanging, but he will show us where he wants his ornaments hung.

In addition to our advent stockings, we are also doing the chocolates, opening one of the small cardboard doors each day. We got great chocolate for it, each individually wrapped, from Harry & David. I was expecting I might be able to have some since Jameson hasn’t been too into candy, but apparently he knows the good stuff when he sees it and is eating it all.

He was a little hyper Monday night, running and jumping around like a maniac and taking a good 45 minutes to fall asleep. Last night we tried giving it to him right after work in hopes of toning the hyper down right before bed, but it only worked so-so. Turns out that giving a toddler chocolate in the evening is not a great idea! We may have to move to mornings if things don’t get better, haha.

Jameson has also been asking nearly every night, about 3 times in a row, who all the nativity scene people are in our set. “Dis?” Goat. “Dis?” Cow. He knows the baby, and has started identifying Mary and Joseph and Jesus’s mom and dad. Or just “mommy” and “daddy”. Too funny!

Continue Reading

Easter Basket Crafting

Now that Valentine’s is over, I can safely  move on to Easter.

I mean… well, full disclosure, I have had the materials for Jameson’s Easter basket since this time last year. It’s been sitting in the craft room, under the table, just waiting for a night like Friday night.

Friday night, my eyes were really dry from taking the dry-out-your-sinuses medication (the good stuff), so I didn’t want to watch much TV or read. What better thing to do than whip out my new (year old never used) glue gun and create Jameson’s Easter basket?

I had even pre-printed the directions from Factory Direct Craft (my favorite go-to online craft store).

Before I begin, I should mention that the materials I used were hard to find last year. Apparently they were discontinuing jumbo loopy chenille. Last year when I heard it was being discontinued I actually bought enough to do two, maybe even three, Easter baskets. Ahem. But lucky for you, apparently some colors are still in stock this year whaddayaknow.

My Easter basket is extra large, so I used some extra of the materials. Here’s how big my basket is:

That’s the same basket, last year, with Jameson inside it. He wouldn’t fit this year though, so I guess I didn’t have an excuse to wait on this project any longer.

Here’s my materials:

basket
2 hanks (6 yards to a hank) of green jumbo loopy chenille
1 hank of white regular size loopy chenille
1 – 4″ styrofoam ball (after you add the chenille on, it looks like it’s 6″ big)
1 – 1″ white pom pom
2 – big googly eyes
1 – craft stick (aka popsicle stick)
floral u pins (for added security with the glue gun)
hot glue gun

Step 1: Your popsicle stick is going to be the base:

You need to secure that popsicle stick with glue. You’ll be using a lot of glue.

Step 2: Then you stick the ball on top of the stick. And add a bit more glue.

Step 3: Now you get to start wrapping the head. I started with some glue and a floral pin to keep it in place, and just added glue periodically as I wrapped from the bottom up.

Step 4: Once I reached the top, I didn’t cut the chenille. I decided to just use take another floral pin there and go ahead and make my ears (less glue needed then, right?)

I eye-balled the size I wanted the ears, about 6″ long or so. I cut the chenille and glued it down.

Step 5: Then I cut about 10″ or so of the loopy chenille twice, for two cheeks (aka bunny’s muzzle). I made my cheeks a bit bigger after I did the initial 6″ recommended by the directions on Factory Direct Craft because it didn’t seem proportionate to my large basket.

Lots of glue.

Step 6: It’s up to you, but here’s where I went ahead and glued the eyes and nose on, just to make sure everything looked good size-wise.

Step 7: Then it’s time to do the arms. I did my arms with the second hank of green chenille in one go. I wrapped around each handle twice, then secured it with what else – glue – at the back, with the popsicle stick and the bottom of the styrofoam ball.

Step 8: Don’t forget the feet! I did the feet in one swoop as well. In my opinion, the less cutting, the more secure it is, right?

The only way the feet are secured with with a lot of glue, so I tried to glue at major points/seams in the basket where it was structurally more sturdy. I wasn’t too concerned with amounts that way, I just started wrapping until one foot looked big enough, then looped over to do the other foot.

Step 9: The only thing left at this point, you may notice, is the white of the ears and the tail. I used my while chenille and cut two pieces so they’d fit inside the ears. Since I had regular sized chenille instead of jumbo, I doubled the length and folded it in half. You wouldn’t need to do that with jumbo size.

Step 10: For the tail, just take some more white chenille and roll it in a ball. And glue!

You’re all done!

Optional Step 11: You can add ribbon for a bow or whiskers or whatever you like. My mom made a version (much smaller) than this for my Easter basket that I had when I was growing up. Mine was white in the palms of it’s feet, a white muzzle instead of colored, whiskers, and googly eyes with eye lashes.

Correction from my mom: My mom didn’t make my Easter basket (cause I’m not the favorite haha). My grandpa’s cousin made the basket (and also made my mother’s manger scene).

This project was super easy, and I can’t believe I waited a year to do it. I only got hot glue on my fingers twice when doing the white chenille inside the ears.

Continue Reading

Bridesmaid Woes

I’m losing weight. Counting calories is working for me again. At first, I felt like I was starving myself. It’s true that your body adjusts though, and I feel pretty good now. Except my constant craving for chocolate and pasta. But that is totally normal. Honestly, I’m not pregnant or breastfeeding, I don’t need to consume 12,000 more calories a day anymore. Just 1,200, cause I’m sedentary. Woes of an office job.

Goal 1, fit in my first set of smaller pants, is met as of today! Now I need to fit into the second set, and then that bridesmaid’s dress I already bought. Woes of a bridesmaid.

Speaking of bridesmaid… planning for my friend’s shower is well underway. Invitations went out on Monday, so they should arrive today or tomorrow.

(I need to mention here that I re-created and modified a design I saw on another site; therefore this design was solely for my personal use and no profit will ever be gained from it. Hence the line through it.)

The best part is that they were free, though not without some trials and tribulations. I printed these with Vistaprint, but they gave them to me for free after two sets of them came with various defects (the first set I bought, half of them had lines down the side; the second set, all of them had a white line on the back top). Luckily, Emma had cut down her list somewhat and I didn’t have to use many of the defected ones at all.

The fonts are from the Lost Type Co-Op; Wisdom Script & Mensch.

EMMA – if you are reading this, you should stop here unless you want to ruin one of your gifts.

.

.

.

.

I also had Thank You’s printed in the same design, and pre-labeled envelopes for her as a bonus. Isn’t addressing Thank You’s the worst? This is part of my shower gift for her.

These I actually printed with BestValueCopy, which I have used before for other projects. They print great, I’ve never had any problems. Unfortunately, they don’t have paper stiff enough for invites, but for Thank You’s it was perfect. Their index paper is almost a semigloss. I had envelopes from previous projects, but you could get them in bulk easily enough.

As for decorations, I’ve been collecting wine bottles and baby jars, I just need to decide what to do with them. Next weekend, I am going to visit the room to see what it looks like so I can continue moving forward with the planning. Stay tuned!

Continue Reading

Jameson’s First Art Projects

Last week, Jameson came home with his very first art project (okay, not very first– he’s had his hand prints and foot prints done). So I guess I mean, his very first creative art work, where he was free to mess to his heart’s content. He came home with a lovely blue painting, now on display on his dresser.

This inspired me to help Jameson make a birthday gift for his lovely Aunt Melissa who turned 30 on Friday!

Four tubes of finger paint later, Jameson was sitting in his high chair stripped of his shirt, ready to paint. I put four globs on paint on the paper and let him have at it.

He was kind of delicate at first, but he got into the swing of it pretty quickly.

He only tried to suck on his fingers twice, and eat the paper once. I rescued him all three times, and no paint ended up on his chest, so that is pretty much a win-win-win.

Aunt Melissa loved it! Grandma was a little jealous…

As an aside, I don’t think Jameson will be opening his own gifts on his birthday just one short month away. He was fascinated with eating the box and wrapping. Aunt Melissa has threatened to give him just an empty box on his birthday, which I’m sure he would love.

Continue Reading

Christmas Crafting!

This morning, I woke up to a light dusting of snow in the yard, so it is definitely appropriate now to start talking Christmas crafts.

It is apparent by all my other unfinished crafts that I can only handle one small thing at a time:

  • A table runner for the dining room remains only a vision in my head and some fabric that I purchased
  • A starburst mirror over the headboard of our bedroom is only a vision, and barely that
  • Jameson’s Easter basket will now need to wait until closer to Easter this coming year, but all the materials are purchased
  • Jameson’s birthday garland is waiting for me to complete!

So when I decided I wanted to do a Christmas advent calendar, I already gave myself permission to leave it incomplete this year. In fact, my whole plan hinges on that fact.

The idea started last year in Pottery Barn or one of those other fancy-shmancy stores had a lovely stocking advent calendar garland for sale for some $75-$100 bucks. It never went on clearance, because of course the adorable thing sold out. This year, they’re popping up all over the place.

{from Horchow}

A couple are even on Amazon.

{from Amazon}

I found cheaply made ones on Ebay, and expensive ones on Etsy.

I figured that I could make one that looked great for less though: without making the stockings themselves. That’s key, because I’m lazy, remember? I pinned this lovely idea instead.

{from Canadian House & Home}

Except I really, really wanted mine made of knitted stockings. So I combed the internet. Do you know how hard it is to find anything that looks good when you search “knitted stocking”? I threw in different words to broaden and narrow my search, but Google failed me.

There were a few on eBay that looked promising, but they were expensive and I couldn’t find enough of them. What I kept finding instead were those faux velvet and fluffy looking stockings, but that totally defeats my purpose of looking handmade, right?

Instead, I had a moment of epiphany. My old standby, Factory Direct Craft. They had them, and they had them cheap!

{from Factory Direct Craft!}

Not only will I now have stockings, but I can also use a few mittens, how adorable will that be? I plan on hanging them off the stairway instead of the mantle.

So the plan from here is to work on the cheap: I want to collect ornaments on clearance for the gift part of this advent calendar. I don’t plan on stuffing these with more gifts than Jameson needs year after year. Instead, I want to use the Jesse tree story with ornaments that symbolize different Bible passages.

I first really understood the Jesse tree last year while at church they had all the children hanging ornaments. I love the idea! This will be a great way to celebrate Christmas year after year. I’ll keep you posted on my ornaments finds.

Continue Reading

MixBook (wherein I give up and find something better)

Okay, to be quite honest, I didn’t touch Jameson’s digital scrapbook after I posted about it way back in July.

I could only work on it at home, and the thought of it and the amount of time that still needed to go into it was scary. So when a Groupon came up for MixBook, I decided to go for it. MixBook is a photobook site that is also known for their digital scrapbooking “materials”. They have a lot of digital stickers and papers for use on scrapbook-style photo books.

It did not meet one of my requirements: I had wanted a book that would lay flat. However, in the interest of time, effort, and fun I decided to use it anyway. I am so glad I did!

The software is all web-based, so I can work on it anywhere (which includes at work during lunch, for which I am thankful or this would never get done). I’m nothing if not realistic.

The most efficient way to complete the first one (yes, there will be two… I have only been working on his birth to 6 months scrapbook) is to start with throwing some photos on the pages. Then, select some layouts for those pages, then background papers, then stickers, and finally what I have been working on now it to add the text.

To build out the text, I have been using the blog, flickr photo captions, and my personal facebook account which I pulled the archive for. Have you ever pulled your archived facebook content before? I am amazed. I have been on facebook for so long that I was confused, because back in its first iteration, it didn’t have my statuses, just what other people put on my wall.

So here I am, at 69 pages of Jameson from birth to 6 months. That’s roughly a page for every 2-1/2 days, which is crazy, but awesome. I am feeling accomplished, and excited. I can’t wait to share the finished product!

Continue Reading

Bridal Shower Inspiration

One of my oldest friends, Emma, is getting married next June in New Jersey. I am the matron of honor, and I’m very excited to be helping plan her bachelorette party in Vegas and her bridal shower which will actually be in her (and my) old hometown.

I’ve been using Pinterest to remember things as I see them, and today I put together a mood board with my ideas. I think a mood board should be all one color or theme, but I don’t pretend to be a mood board expert, so it is what it is! Emma’s colors are jewel tones of teal and blue.

Up-cycling wine bottles (and baby food jars) are just a few of the ways I’m planning on saving money while still planning a fabulous shower. Of course, ideas are all good, but I still need to get down to the actual planning (the ugly details of who can help out). Luckily, I have plenty of time left. I’ll just keep pinning away!

wine-cork candle holder | ad-lib advice for the couple | recipe cards | x’s o’s and hanging photos | wine bottles as flower vases | wine bottles for water and lemonade | bride-to-be sign | mini cupcake in a jar | cake balls

Continue Reading

Crossing off the to-do list

Last weekend was so nice out, Brian finally got to cross off something from his to-do list! (His personal one that is, not the one that I have for him… just kidding! sort of). Anyway, he’s been waiting since the shed was done last winter to put a ramp on it.

I don’t think I ever talked too much about the shed, but it was pretty much a long drawn out ordeal in which I demanded he finish before baby and it pretty much was impossible. It was finished about a month after the baby was born (with the help of some good friends!), in the snow.

The story quickly, in pictures:

So last weekend, he built a ramp that could hold a car. If a car was that narrow.

When the shed was built, he left an unfinished piece at the base of the door to hook the ramp up to.

All framed up! Note the side boards are in the ground. When all was done, about a foot of the side boards were in the ground for stability.

Oops. Need to get more wood!

And finishing touches.

Brian is really proud of how tightly the ramp came together with the shed.

All done! About 6-7 hours of work over the weekend. What this means for me is that stuff can finally go into the shed and stay there, like the tractor mower, and the old couches which we are still trying to find a place to take will go into the other garage annnnd I get to park in the garage again!

This weekend, we plan to plant a few more flowers, in hanging baskets around the porch. Also, we need to replace the rail basket. Oops. (Did you see how I captured live plants in the distance in this picture? that is so you don’t think I am a complete failure)

What are your weekend plans?

Continue Reading